GeometryReader Overview for Beginners
Resources
Table of contents
Apple says: "A container view that defines its content as a function of its own size and coordinate space. This view returns a flexible preferred size to its parent layout."
@frozen struct GeometryReader<Content> where Content : View
In simple term, GeometryReader is a container that will fill the available space, unless given a fixed frame, and will provide its children with the exact size (width and height) that it occupies as well as its coordinates space (X-Origin and Y-Origin).
// $$liquidcoderFilename-ContentView

import SwiftUI

struct ContentView: View {

    var body: some View {
        Text("Hello, World!")
    }

}
Consider the following example code, as you see the text is perfectly centred with its size matching its content.

Let's now surround the text with a GeometryReader container, and what happens.
// $$liquidcoderFilename-ContentView

import SwiftUI

struct ContentView: View {

    var body: some View {
        GeometryReader { geometry in
            Text("Hello, World!")
                .border(Color.blue)
        }.border(Color.red)
    }

}

Oops! The Text is not centred anymore. This is because GeometryReader align its children's with its origin (x = 0, y=0).
The other thing to note is that the container does not completely fill the entire screen, the top and bottom spaces accommodate the safe areas, so technically those space are not part of the usable screen unless ignored.
// $$liquidcoderFilename-ContentView

import SwiftUI

struct ContentView: View {

    var body: some View {
        GeometryReader { geometry in
            Text("Hello, World!")
                .border(Color.blue)

            Text("Green")
                .border(Color.green)
        }.border(Color.red)
    }

}
No matter how many children you add inside, they will all be stacked on top of each other aligned with the parent's origin.

GeometryProxy
Apple says:"A proxy for access to the size and coordinate space (for anchor resolution) of the container view."
GeometryReader will give us an object of type GeometryProxy upon initialisation that contains its size and coordinate space.
// $$liquidcoderFilename-ContentView

import SwiftUI

struct ContentView: View {

    var body: some View {
        GeometryReader { geometry in
            // highlight-start
            VStack(alignment: .leading)  {
                VStack(alignment: .leading)  {
                    Text("Height : \(geometry.size.height)")
                        .padding()

                    Text("Width : \(geometry.size.width)")
                        .padding()
                }
            }
            // highlight-end
        }.border(Color.red)
    }

}

Now, let's change the frame and see what happens.
// $$liquidcoderFilename-ContentView

import SwiftUI

struct ContentView: View {

    var body: some View {
        GeometryReader { geometry in
            VStack(alignment: .leading)  {
                VStack(alignment: .leading)  {
                    Text("Height : \(geometry.size.height)")
                        .padding()

                    Text("Width : \(geometry.size.width)")
                        .padding()
                }
            }

        }.border(Color.red)
        // highlight-start
        .frame(width: 300, height: 400)
        // highlight-end
    }

}
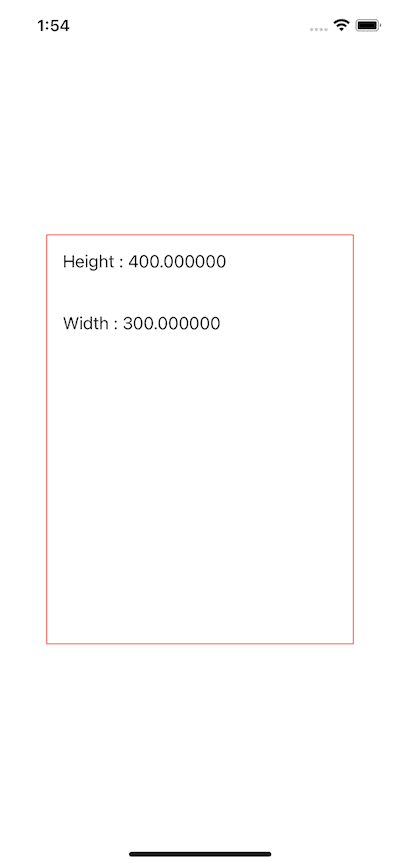
As you can see the height and width on the GeometryProxy have changed reflecting the same values we set using the frame modifier.
Next, let's take a look to GeometryProxy's frame .
// $$liquidcoderFilename-ContentView

import SwiftUI

struct ContentView: View {

    var body: some View {
        GeometryReader { geometry in
            // highlight-start
            VStack(alignment: .leading) {

                Text("Global origin X : \(geometry.frame(in: .global).origin.x)")
                    .padding()

                Text("Global origin Y : \(geometry.frame(in: .global).origin.y)")
                    .padding()

                Text("Local origin X : \(geometry.frame(in: .local).origin.x)")
                    .padding()

                Text("Local origin Y : \(geometry.frame(in: .local).origin.y)")
                    .padding()
            }

            // highlight-end
        }.border(Color.red)
    }

}

The frame function returns a CGRect type which contains a size and an origin.
Taking a look at the preview, you can see that the Global origin Y is different from the Local origin Y, the global origin is relative to the parent whereas the local one is relative to itself.
// $$liquidcoderFilename-ContentView

import SwiftUI

struct ContentView: View {

    var body: some View {
        GeometryReader { geometry in
            // highlight-start
            VStack(alignment: .leading) {
                Text("Safe area top : \(geometry.safeAreaInsets.top)")
                    .padding()

                Text("Safe area bottom : \(geometry.safeAreaInsets.bottom)")
                    .padding()

                Text("Safe area leading : \(geometry.safeAreaInsets.leading)")
                    .padding()

                Text("Safe area trailing : \(geometry.safeAreaInsets.trailing)")
                    .padding()
            }
            // highlight-end
        }.border(Color.red)
    }

}

You can also get access to the safe area insets directly from the GeometryProxy object, and a you will get valid values if there's no fixed frame applied to the GeometryReader .
// $$liquidcoderFilename-ContentView

import SwiftUI

struct ContentView1: View {

    var body: some View {
        GeometryReader { geometry in
            // highlight-start
            VStack(alignment: .leading) {
                Text("Global MinX : \(geometry.frame(in: .global).minX)")
                    .padding()

                Text("Global MinY : \(geometry.frame(in: .global).minY)")
                    .padding()

                Text("Local MinX : \(geometry.frame(in: .local).minX)")
                    .padding()

                Text("Local MinY : \(geometry.frame(in: .local).minY)")
                    .padding()
            }
            // highlight-end
        }.border(Color.red)
    }

}

Apple says: "Returns the smallest value for the x-coordinate of the rectangle."
Those properties have their max equivalent which return the largest coordinates rather than smallest.
// $$liquidcoderFilename-ContentView

import SwiftUI

struct ContentView1: View {

    var body: some View {
        GeometryReader { geometry in
            // highlight-start
            VStack(alignment: .leading) {
                Text("Global MidX : \(geometry.frame(in: .global).midX)")
                    .padding()

                Text("Global MidY : \(geometry.frame(in: .global).midY)")
                    .padding()

                Text("Local MidX : \(geometry.frame(in: .local).midX)")
                    .padding()

                Text("Local MidY : \(geometry.frame(in: .local).midY)")
                    .padding()
            }
            // highlight-end
        }.border(Color.red)
    }

}

The CGRect object returned by the frame also has mid-coordinates (midX and midY) which are the center coordinates of the rectangle constructed by the 4 points we've just talked about.
Check out the illustration on the right which shows where those min and max coordinates are located.
Here is how they are calculated:
minX = origin.x
minY = origin.y
maxX = origin.x + size.width
maxY = origin.y + size.height

Use cases
GeometryReader can be daunting when you first start working with it, but once you get acquainted with its few rules , you will find that it's quite a fun feature to play with, and most importantly very powerful.
// $$liquidcoderFilename-ContentView

import SwiftUI

struct ContentView: View {

    var body: some View {
        GeometryReader { geometry in
            Image("image")
                .resizable()
                .scaledToFit()
                // highlight-start
                .frame(width: geometry.size.width * 0.7, height: geometry.size.height * 0.4)
                .offset(x: (geometry.size.width - (geometry.size.width * 0.7)) / 2, y: 0)
                // highlight-end
        }.border(Color.red)
    }

}

We use an Image view as an example. We will center it along the x axis (horizontally), so we are only interested in the width, not the height.
We give the Image a width equal to 70% of the parent, then apply an horizontal offset equal to half of the difference between the parent's width and the child's. This will center the image no matter the parent's width.
// $$liquidcoderFilename-ContentView

import SwiftUI

struct ContentView1: View {

    var body: some View {
        ScrollView {
            ForEach(0 ..< 15) { item in
                GeometryReader { geometry in
                    // highlight-start
                    Text("""
                            Global X: \(geometry.frame(in: .global).minX) \n
                            Global Y: \(geometry.frame(in: .global).minY) \n
                            Local X: \(geometry.frame(in: .local).minX) \n
                            Local Y: \(geometry.frame(in: .local).minY) \n
                            """)
                        // highlight-end
                        .frame(width: geometry.size.width * 0.7, height: geometry.size.height )
                        .offset(x: (geometry.size.width - (geometry.size.width * 0.7)) / 2, y: 0)

                }.frame(height: 400)
            }
        }
    }

}
Take a look at this next example...We put a list of GeometryReader containers inside a scrollview. Note that we need to give each of them a fixed height for it to be displayed.
When you scroll, you will see that only the global minY changes. There are 2 reasons for that:
- The default scroll
axisisvertical, so only y values are changing. - The global coordinates are relative to the device's screen which means they reflect the origin position in the screen's rectangle.

// $$liquidcoderFilename-ContentView

import SwiftUI

struct ContentView1: View {

    // highlight-start
    var screenHeight = UIScreen.main.bounds.height
    var screenWidth = UIScreen.main.bounds.width
    // highlight-end

    var body: some View {
        ScrollView {
            ForEach(0 ..< 15) { item in
                GeometryReader { geometry in
                    // highlight-start
                    createImage(geometry: geometry)
                    // highlight-end
                }.frame(height: 700)
            }
        }
    }

    // highlight-start
    private func createImage(geometry: GeometryProxy) -> some View {

    }
    // highlight-end
}
For the final demo, we need the entire device screen height and width. We then replace the Text view with the call to that createImage function created a little bit down.
Now let's do the remaining work in that function.
// $$liquidcoderFilename-ContentView

import SwiftUI

struct ContentView1: View {

    var screenHeight = UIScreen.main.bounds.height
    var screenWidth = UIScreen.main.bounds.width

    var body: some View {
        ScrollView {
            ForEach(0 ..< 15) { item in
                GeometryReader { geometry in
                    createImage(geometry: geometry)
                }.frame(height: 700)
            }
        }
    }

    private func createImage(geometry: GeometryProxy) -> some View {

        // highlight-start
        let height = geometry.size.height
        let minY = geometry.frame(in: .global).minY

        let scrolledInterval = max(0, min(minY, screenHeight))
        let scrolledPercent = scrolledInterval / screenHeight

        return Image("image")
            .resizable()
            .frame(width: screenWidth, height: height - (height * scrolledPercent) )
            .rotation3DEffect(
                Angle(degrees: 70 * Double(scrolledPercent)) ,
                axis: (x: 1.0, y: 0.0, z: 0.0),
                anchorZ: 0.0,
                perspective: -1.0
            ).scaleEffect(1.0 - scrolledPercent)
        // highlight-end
    }
}
The main component that makes the effect possible is the minY from the frame which is the only dynamic variable in this case.
GeometryReader is one of the most powerful features in swiftUI. One can create amazing effects with it, and sky is the only limit really.